Branching Scenarios in eLearning – the Whats, Whys, and Hows
Are you looking for a way to train your employees that’s better than well-worn, linear click-and-read courses? This is where branching scenarios can help. Have your learners take on the role of decision makers, let them make their own choices, and see the results.
What Are Branching Scenarios?
Simply put, branching scenarios are routes through the learning content that depend on the actions taken by a learner. They challenge a user to make decisions and then represent the consequences that ensue based upon the action that was taken.
Examples of branching scenarios
There may be different levels of branching. For instance, let’s take a look at “Lifesaver,” an award-winning crisis simulator designed to teach CPR. This is a complete live-action film that places the viewer right in the middle of a serious problem and gets them to make the choices they’d have to make in an actual emergency, with the clock ticking. If they make the wrong decision, someone dies!

To demonstrate how a branching scenario flows, we’ll get into some of the structure of the “Lifesaver” and see how the scenes are connected. The most convenient way to do that is to create a mind map.
A fragment from the “Lifesaver” branching scenario
As you can see, “Lifesaver” provides a scenario with a high level of interactivity, and creating such a film requires professional filmmaking skills and significant costs.
Dialogue sims are role-playing games that mimic real-life conversations between people and are typically used to help employees – primarily sales professionals and customer support agents – master their communication skills. Such sims should have well-thought-out scenarios, where each decision has a logical consequence.
The mind map below shows how the conversation between a salesperson and a client starts and which ways it can develop, depending on the sales professional’s actions and the customer’s answers.
A fragment from the car dialogue branching scenario
To create dialogue simulations, you don’t need any specific skills or even any experience in eLearning. Modern authoring tools like iSpring Suite Max allow you to make them quickly and easily, with no prior training.
Here’s another example. This is a quiz created with iSpring Suite Max to test learners’ knowledge of diet and nutrition.
The quiz also involves branching, but on a different level (this is the simplest kind of branching). In case the learner answers a question correctly, they proceed to another challenging question. If the learner answers a question incorrectly, they are automatically forwarded to a slide with additional information on the subject. This is how it looks structurally:
Quiz branching scenario
Why Should You Use Branching Scenarios?
Branching scenarios have been used in eLearning for years, mainly because they are so effective. But what’s the secret of this fabulous effectiveness?
- Higher engagement. Instead of burying themselves in a lot of text, your learners have the opportunity to make choices that produce circumstances. They’re not just observers, but active participants who have a vote. This triggers positive feelings and makes learners invest in learning (both behaviorally and emotionally) even more intensely.
- Better retention. Branching scenarios allow people to learn from their mistakes. Understanding what real consequences their choices can lead to, as in the “Lifesaver” simulator, or revising the material they can’t recall, like in the quiz example above – all this can help you absorb the information more easily and keep it in your memory longer.
- Risk-free environment for practice. Let’s say you want to train your employees on how to deal with an angry customer. Instead of making them practice their communication skills in a real-life situation and risk damaging relations with a client, you can have them do this in a safe environment, with the help of a dialogue simulator. Branching scenarios will let them see how their choices will impact their job performance and help them avoid mistakes in real life.
Branching Scenario Software
Now that you know exactly what branching scenarios are and how they can help improve the learning experience, let’s see what software you may need to create training on your own. Here’s a roundup of some tools you might like.
1. iSpring Suite Max

iSpring Suite Max is a definitive toolkit for building mobile-friendly eLearning content. You can create various kinds of training materials, including slide-based courses, quizzes, and conversation simulations that allow you to set up branching. When building a dialogue sim, you can arrange all the scenes in a tree structure that makes even the most complex branching scenarios clear and allows you to manipulate them with a single click.
To see how to configure branching for different content types with iSpring, continue reading the article or click here ↓ to go directly to this explanation.
Pricing: $970 per year. This includes the iSpring Suite Max authoring toolkit, iSpring Content Library, online space for collaboration and authoring, live priority support via phone and chat, and all updates.
2. BranchTrack

Branch Track is a tool for creating conversation simulations. Like iSpring, it has an editor where the branching scenario is presented as a tree. You can create scenes and connect them with each other with a drag-and-drop function. There may be several alternative scenario branches – depending on the learner’s choice, a scenario may have different outcomes.
Pricing: In comparison with iSpring Suite Max, that allows you to create an unlimited number of dialog simulations, courses, and quizzes for only $970 per year, Branch Track enables you to make only 10 scenarios for $999 per year. There are also some other plans that are even pricier.
3. Chat Mapper
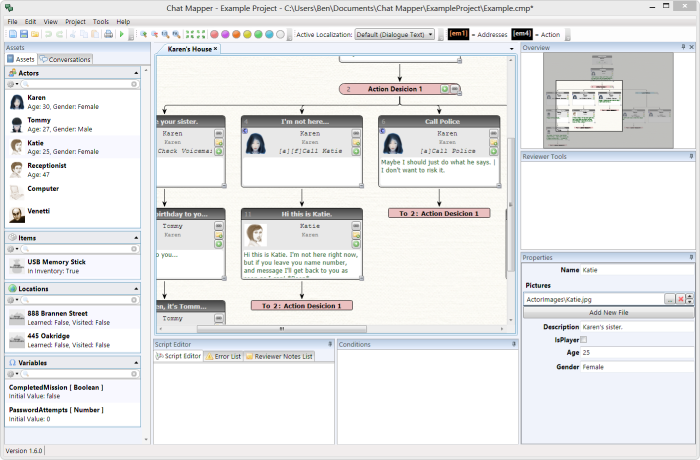
Chat Mapper is software for writing and testing nonlinear dialogue, especially for video games, but it’s also used for eLearning. Like the tools described above, it uses the tree graph for creating branching scenarios. Chat Mapper also provides some additional options like scripts and conditions for building more advanced dialogues and controlling the flow of conversations. However, you can’t create a dialogue simulation with Chat Mapper like you can with iSpring or Branch Track. To do this, you need an authoring toolkit that is integrated with Chat Mapper where you can import your dialogues.
Pricing: The license costs $35 per month (billed annually). There’s also a free plan that provides a limited set of features.
4. WIREWAX

WIREWAX is a video platform with broad interactivity capabilities. It allows you to create branching scenarios by adding hotspots or ‘tags’ to any person or object in the video. With WIREWAX branching techniques, you can make clickable decision points that can then jump or loop the viewer to another timestamp in your video.
Pricing: upon request.
Comparison Sheet
Here’s a quick comparison chart with the tools listed above:
| Type of solution | Best suited for | Price | |
| 1. iSpring Suite Max | A definitive toolkit for creating eLearning content, including slide-based courses, quizzes, and dialogue simulations. | For those who are searching for the easiest and fastest way to create conversation simulations and other kinds of eLearning content. | $970/year |
| 2. BranchTrack | A tool for creating conversation simulations. | For those who want to build dialogue sims with branching scenarios. | From $999/year |
| 3. Chat Mapper | A tool for writing and testing nonlinear dialogues. | For those who want to create conversation sims with advanced branching scenarios. | From $35/month; plus, it requires purchasing an integrated authoring tool. |
| 4. WIREWAX | A video platform with broad interactivity capabilities. | For those who want to create interactive videos. | Upon request |
How to Create Branching Scenarios with iSpring Suite Max
Now, we’ll share practical advice on how to bring your branching scenario ideas to life with iSpring Suite Max. As mentioned, the toolkit allows you to create branching on different levels: in any slide-based course and quiz, as well as in conversation simulations.
Dialogue simulations
If you need to train and assess your employees’ communication skills effectively, use iSpring Suite Max to build conversation simulations.
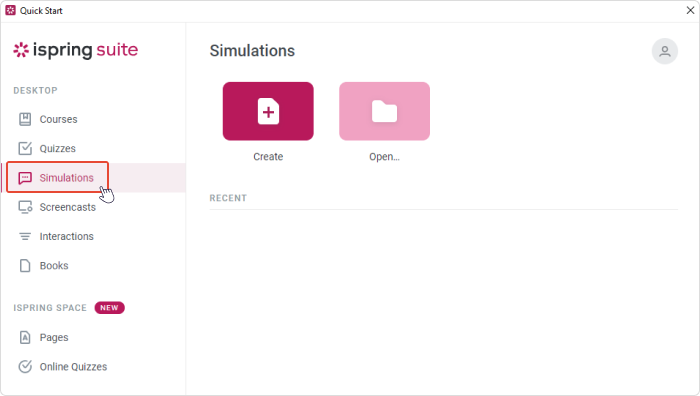
- Open iSpring Suite Max and choose the Simulations tab. Then click on Create.
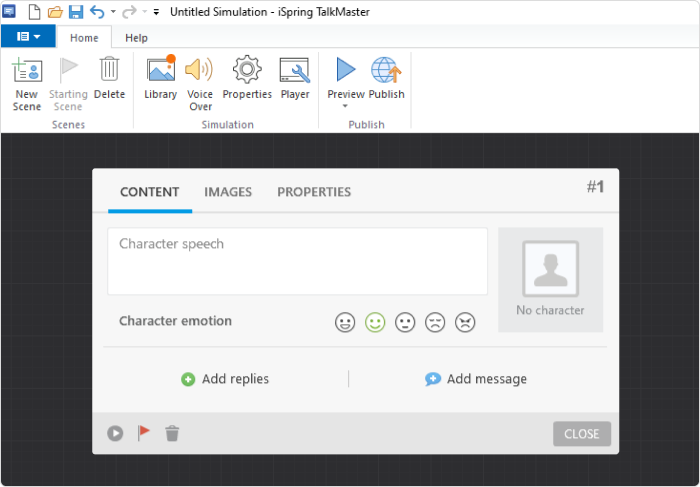
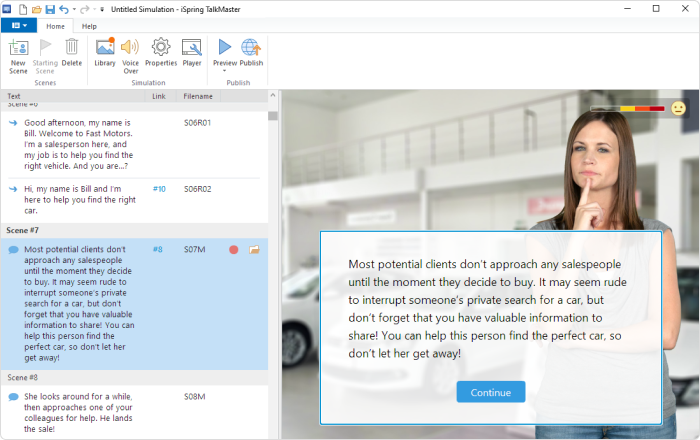
- You will see a black background where you can add scenes. Click on New scene on the iSpring toolbar. A scene consists of a character’s speech and a user’s possible replies.
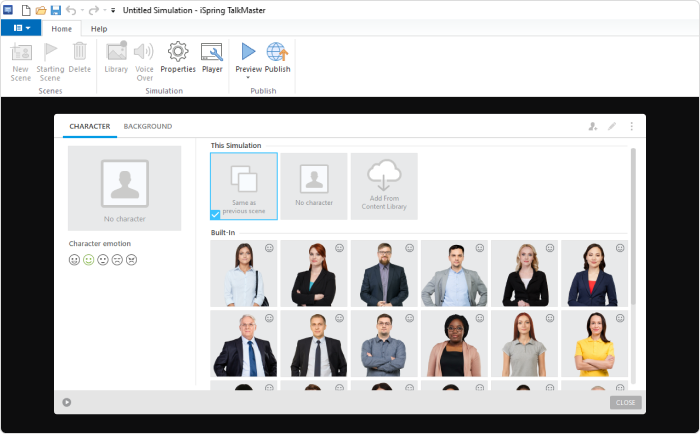
- Choose a character from the Content Library. There are a huge number of characters of different ages, ethnic groups, and professions. Each of them has a range of different emotions, so you can select an appropriate one to make your simulation truly realistic.
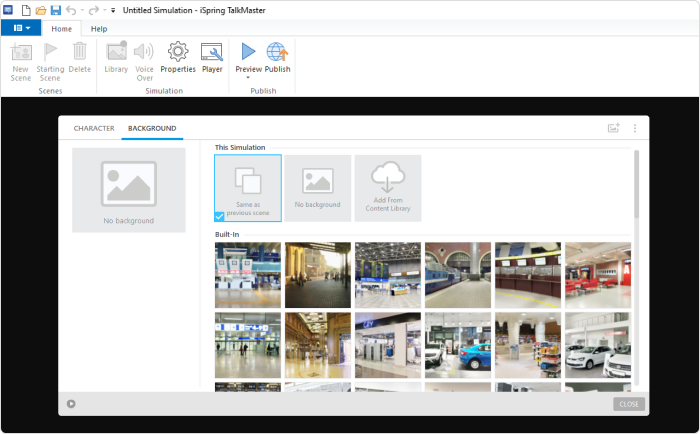
- Go over to the Background tab. Again, with the iSpring Content Library, you’re provided with a wide range of backgrounds for any case: shops, offices, banks, hospitals, classrooms, apartments, airports, and streets.
- Now return to the simulation editor. Add the character’s speech and click on Add replies to give the user some reply choices.
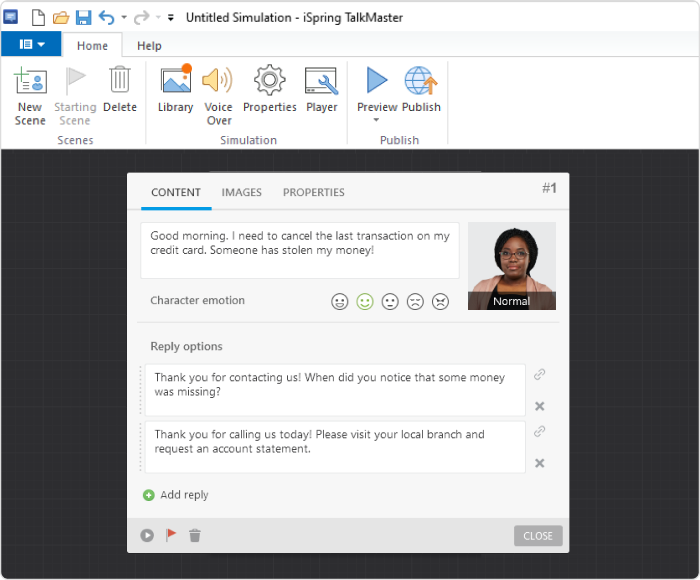 If no reply choices are needed for this part of the simulation, add a Continue button, which you can link to the next scene, choose Add message instead.
- Connect your choices or feedback message with new scenes by dragging the link icons away from the scene dialogue.
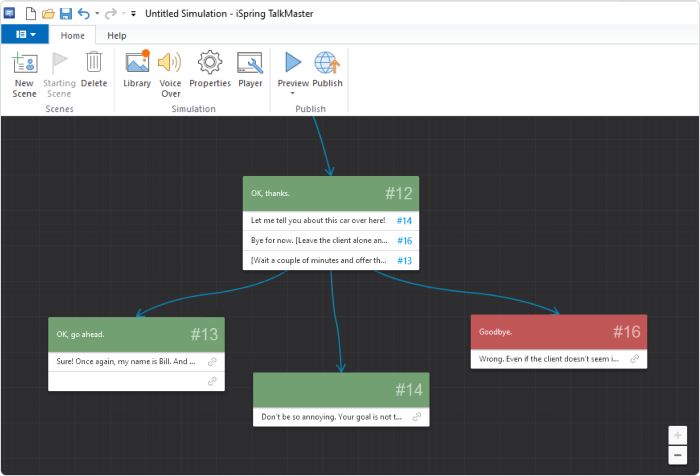 Take the same actions to create other scenes. This way you can build complex branching scenarios to reflect the situations your users may face.
- To make your simulation even more engaging, you can add a voiceover – record or import audio for each scene.
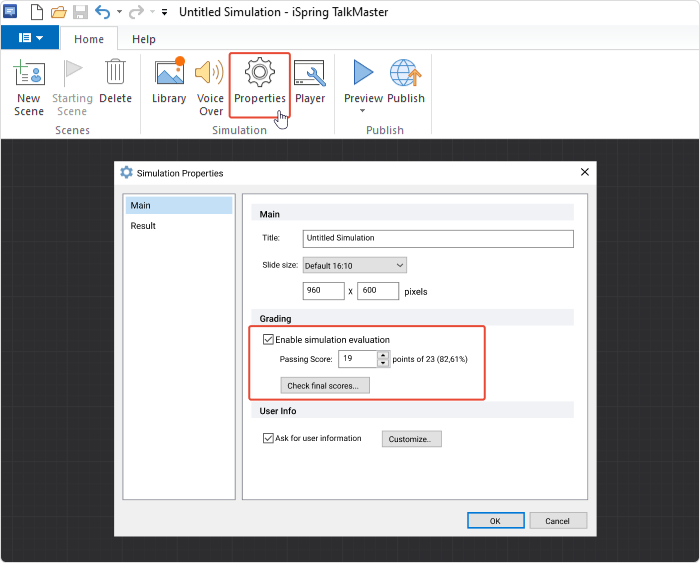
- If you want to assess your learners’ communication skills, you can create a graded simulation. Under the Properties tab, you need to specify the number of points awarded to a learner for each individual scene. As they go through a conversation, they get points or penalties, and the final score shows how well they performed.
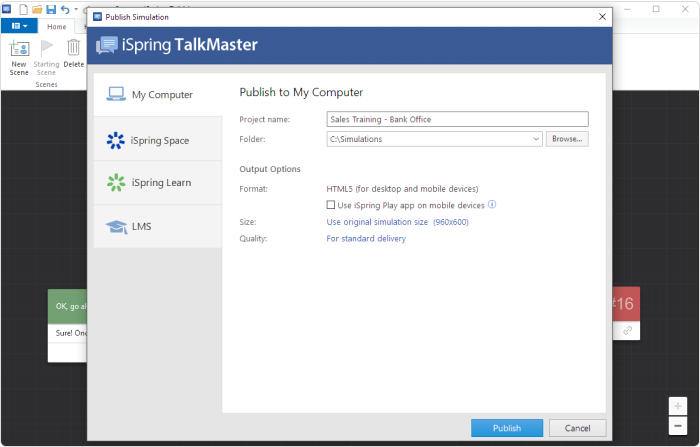
- After your dialogue sim is ready, choose Publish on the iSpring ribbon. You can save it as an HTML5 file for playing on the Web or publish to SCORM or another eLearning format for uploading to a learning management system.
To get deeper into the process of creating conversation simulations, read our complete guide on how to improve your employees’ skills with dialogue sims.
Quizzes
iSpring’s quiz maker lets you perform accurate knowledge checks with various question types: from simple multiple-choice and matching to more advanced sequence, hotspot, and drag-and-drop questions. You can set up branching to personalize your quizzes.
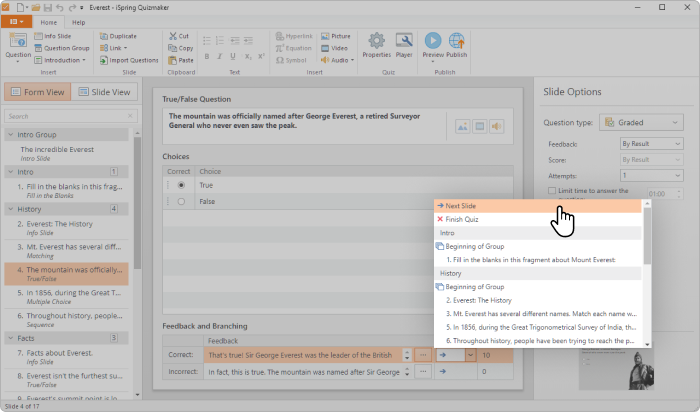
To enable branching, select a question in the Question pane and specify what to do for each outcome (Correct, Incorrect, or Try Again).
Here are the options you can choose from:
- Next Slide – The user will see the next question in the quiz.
- Specified Slide – The user will be forwarded to an info slide if, for example, they give an incorrect answer, or to a specific slide with a question.
- Beginning of Group – The user will be forwarded to the first question of a group of questions dedicated to a certain topic. This can be useful if, for instance, the learner has given an incorrect answer to a question on a certain topic.
- Random Pool – This option works if you have enabled randomization for a group. The user will see the first question from a random selection of questions in the group.
- Finish Quiz – The quiz will end and the user will be moved to the Results screen.
Slide-based courses
iSpring Suite Max also allows you to set up branching for slide-based courses to make them more challenging and memorable. You can specify a path for the learner to navigate through the course, namely set the order that the slides will be displayed in, regardless of the learner’s position in the presentation.
If your course contains a quiz or a dialogue simulation, you can also set On pass and On fail actions. For example, if a user fails the quiz or dialogue sim, they will be taken to the first slide to revise the material, and if they pass, they can continue reading the course.
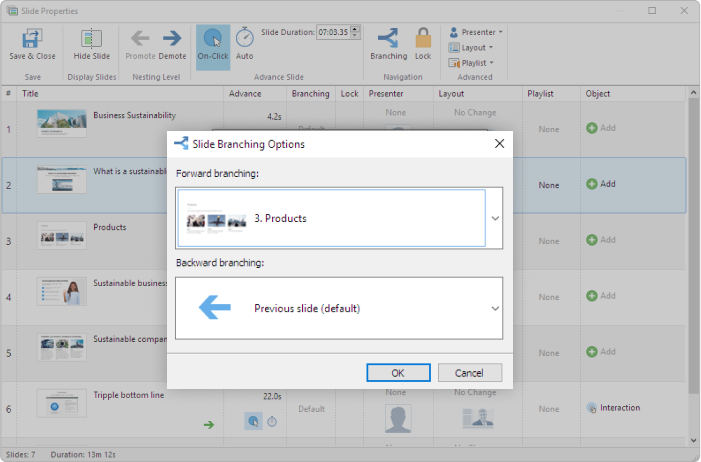
To organize the course structure, go to Slide Properties.

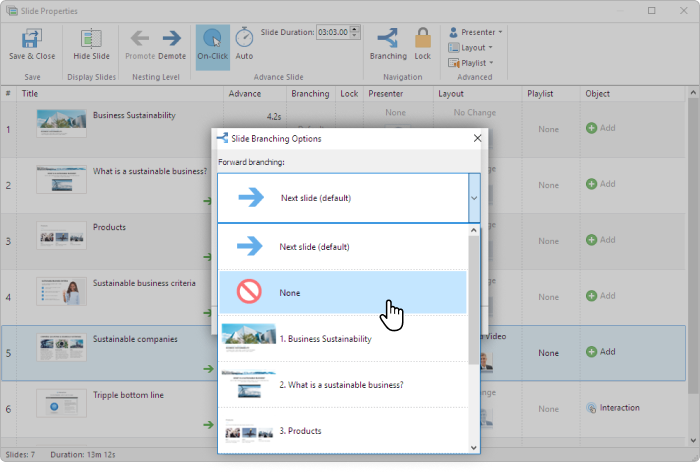
Then click the Branching button on the toolbar. You can adjust each slide’s navigation to take the learner to:
- The Next Slide/Previous Slide
- Any particular slide
You can block the navigation by choosing None. In this case, learners won’t be able to move forward or backward from the slide.
To Sum Up
Branching scenarios are more engaging and effective than linear eLearning courses and a valuable tool for trainers.
If you want to try your hand at building branching scenarios, you will definitely need an authoring tool. Download the iSpring Suite Max free trial to get started today.


