Knowledge Checks in eLearning: Assess to Success

What is the key to an eLearning course’s success? How do you create a course that really works? One of the golden rules is not to overwhelm learners with a non-stop stream of information. Instead, content should be organized by topic and presented in a series of small, logical steps. Another golden rule is to use a knowledge check at the end of each topic so learners can confirm their understanding of the material they’ve just covered.
This article will show you how to create knowledge checks using the iSpring QuizMaker.
What is a Knowledge Check?
Knowledge checks are not considered a formal type of assessment, since they’re not typically graded or tracked. They’re a great way to take the “pulse” of your learner at any given point in your eLearning module. Knowledge checks can be particularly helpful in corporate training by providing immediate feedback and confirmation of learning transfer. Instructional designers often incorporate them into their modules to allow learners the chance to review and assess their progress.
The fastest and easiest way to create knowledge check questions is with an authoring tool. iSpring QuizMaker offers a complete package of components for building multi-platform interactive eLearning assessments. It lets you choose from among 14 different question types, including basic True/False and Multiple Choice questions and engaging Hotspots and Drag-and-Drops.
To see the complete list of questions in iSpring QuizMaker, check out 14 types of Quizzes to Use in Your eLearning Course.
How to Choose Knowledge Check Questions
When creating knowledge checks, it’s crucial to align the question type to the objective or outcome you want learners to achieve. Let’s look at how various question types can be used to support different learning or performance objectives.
Objective example 1: Basic comprehension
If the objective of your eLearning course is to provide your learners with information, facts, basic comprehension, or knowledge of a topic, you can use one of the question types shown below for your knowledge check.
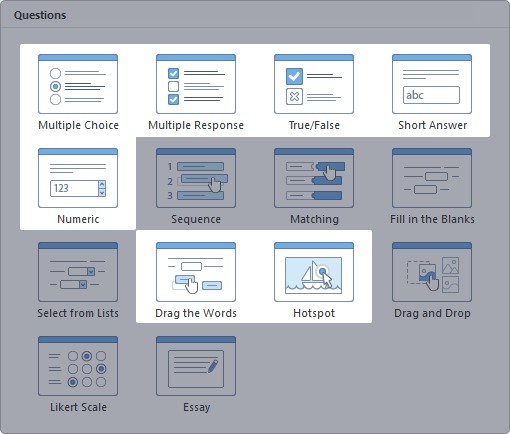
Basic comprehension questions
Objective example 2: Applied knowledge
Your learner can demonstrate their ability to apply what they know by answering a question that measures more than just basic comprehension. These question types are a great way to confirm knowledge application.
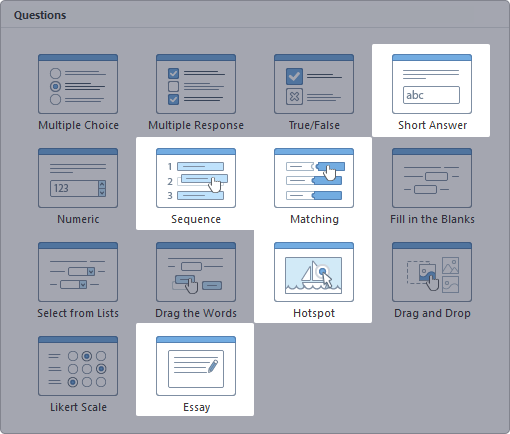
Knowledge application questions
Objective example 3: Processes and procedures
There are some cases when you need to show step-by-step processes and procedures. Use these question types to confirm that your learner is able to comprehend and follow processes and procedural steps.
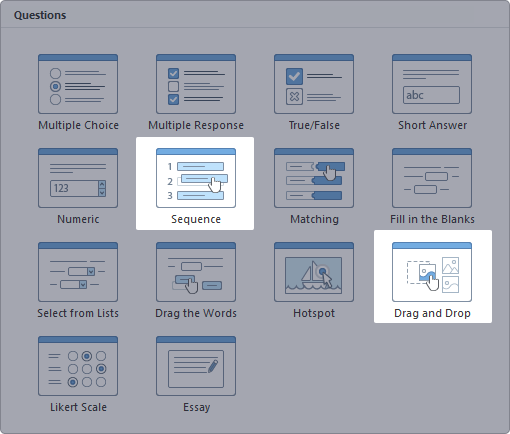
Process and procedure questions
Objective example 4: Feedback
You may wish to solicit feedback from learners on the quality and helpfulness of the learning materials you create. Feedback surveys can provide a structured format to receive and review input directly from the learning audience. Use Likert Scale questions to customize an array of response options. You can also use Numeric, Multiple Choice, and Short Answer questions for these purposes. For in-depth personal feedback, include an Essay question.
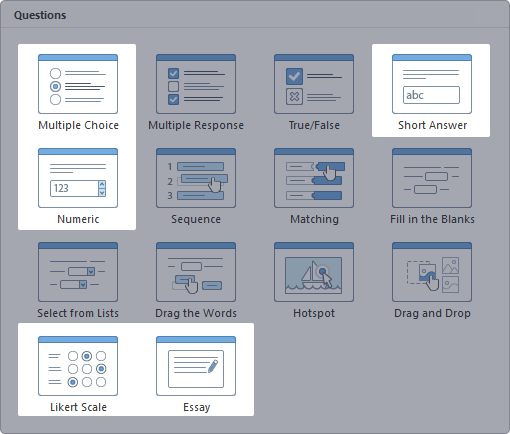
Feedback questions
Knowledge check question examples
Now, when you have an overall picture of how various question types can achieve different learning goals, let’s take a closer look at specific questions and how you can apply them for different training needs.
Prove or apply knowledge: Finding the Hotspot
Hotspot questions are a great way for learners to prove that they can interpret an image and identify or locate a specific element of, or item within, that image. Here are some ways that a Hotspot question can be used to prove knowledge application.
| Knowledge / Skill | Prove with Hotspot |
| Map/Geography | Click the correct area on an image to locate or identify a street, building, neighborhood, city, etc. |
| Software Training | Click a text field to show where data is entered. Click a tab to prove that you know how to navigate to a different page in the application. |
| Safety Training | Click to identify a particular object. Click to indicate a zone of safety (or danger). Click on an item that doesn’t belong. |
Check out how to create a hotspot question for an online quiz →
Meet a performance standard: Drag the Words
Some tasks need to be completed with uniform precision. Drag the Words questions are a good way for learners to prove that they can select the correct standard when faced with an array of choices. Add some extra distractors so your learners can’t randomly guess the answers.
| Knowledge / Skill | Prove with Drag The Words |
| Compliance | Select the right word in the right context to complete a statement correctly. |
| Marketing/Branding | Apply the correct marketing or branding verbiage. |
| Sales | Correctly link features and benefits. Describe product details. Follow a sales pitch or script. |
| Communication | Express ideas in a clear and logical manner. |
Follow a process or procedure: A Sequence of Events
Sequence questions are an excellent way for a learner to prove that they can identify the steps of a process or procedure, then execute the steps in the correct order. This is a good question type to use for medical or first aid, cooking, legal or criminal justice, and project management training modules.
| Knowledge / Skill | Prove with Sequence |
| Medical | Perform a diagnostic task. Follow an established protocol to administer CPR. |
| Cooking | Correctly order the steps of a recipe. |
| Project management | Identify process steps and place them in the correct order. |
How to Build Knowledge Check Questions
Start with a question bank! A question bank is a great way to develop a stockpile of questions for use in quizzes and knowledge checks. You can copy, paste, edit, or re-purpose any item in your question bank for future projects, which can be a great time saver.
iSpring QuizMaker will save your quiz questions as a question group by default. These groups can become the question banks you draw from for knowledge check questions and assessments.
Let’s look at how to create and save a quiz question.
Creating a Multiple Response question
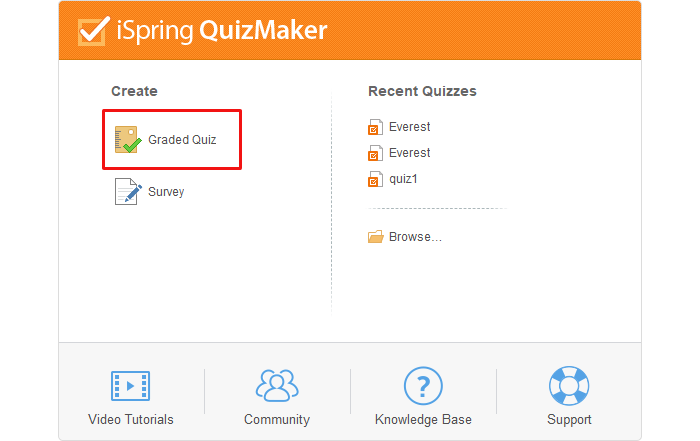
Step 1: Open iSpring QuizMaker
To get started, open iSpring QuizMaker and select Graded Quiz.
Step 2: Select Question Type
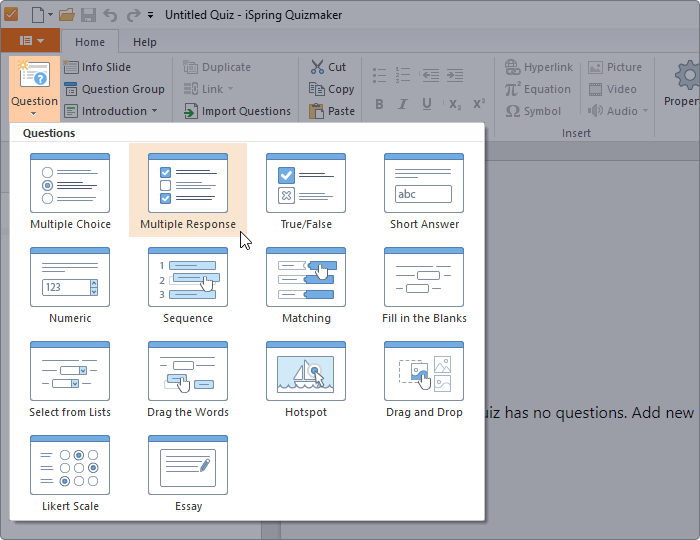
The graded quiz view will open. Click on the Question tab in the top left corner of the screen and choose Multiple Response.
Step 3: Enter your Questions and Answers
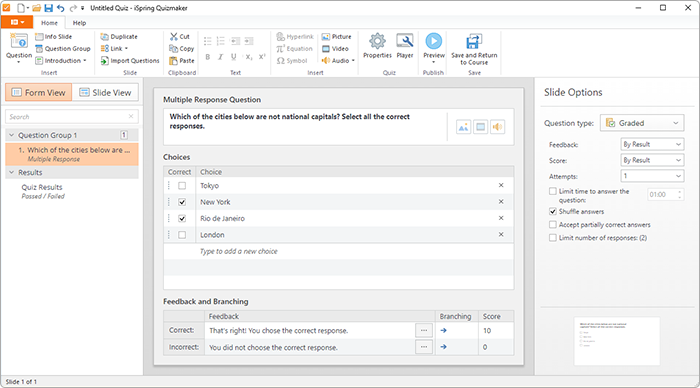
The page will open in Form View. Enter your question text and answers. Be sure to indicate which choices are correct.
Step 4: Design your slide
You can give your slide additional visual appeal by adding an image or changing font size or color. Click on Slide View to see how your slide will appear to learners.
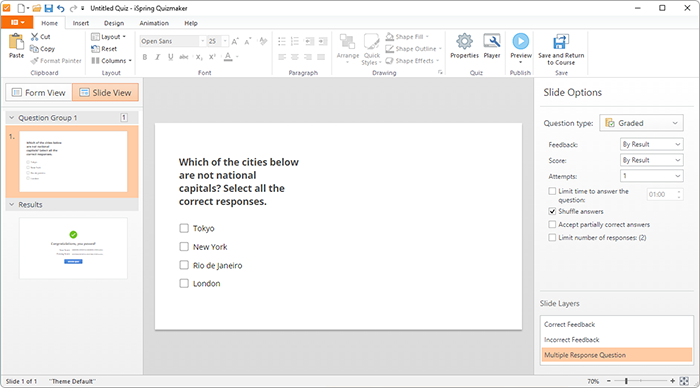
This slide is rather plain. You can import an image to add visual appeal. Click the Insert tab, then select Picture to add a saved image from your hard drive.
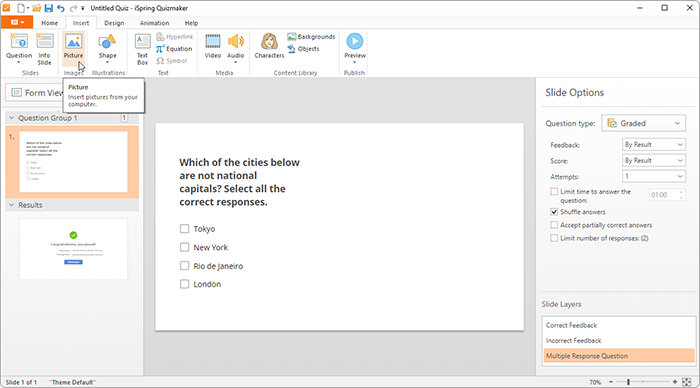
The default slide size is 720 pixels wide by 540 pixels high. Be sure to size your image correctly so that it fits within the slide.
After you insert and size the image, click the Format tab, then Send to Back. This will ensure that all of your text is visible on the screen. Place the image on the slide and re-color text for visibility, if needed.
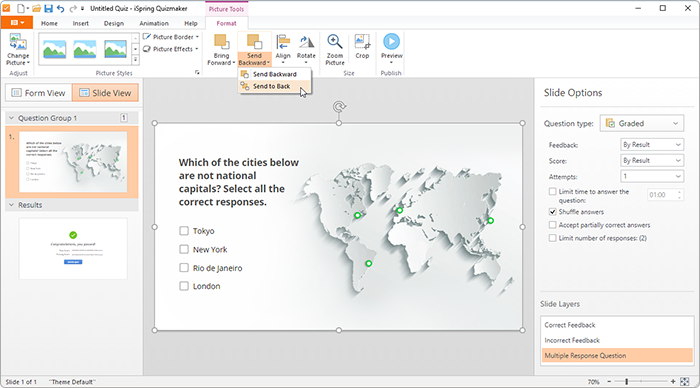
Step 5: Set your slide options
You can set parameters to deliver customized feedback and scoring options for each question on your quiz using the choices from the drop-down menus in the Slide Options panel on the right side of your screen.
- All feedback will be disabled for your question if you choose None as the feedback option. (Most course designers will rarely choose this option.)
- Select By Result to give feedback based on whether the learner’s answer choices were correct, incorrect, or partially correct.
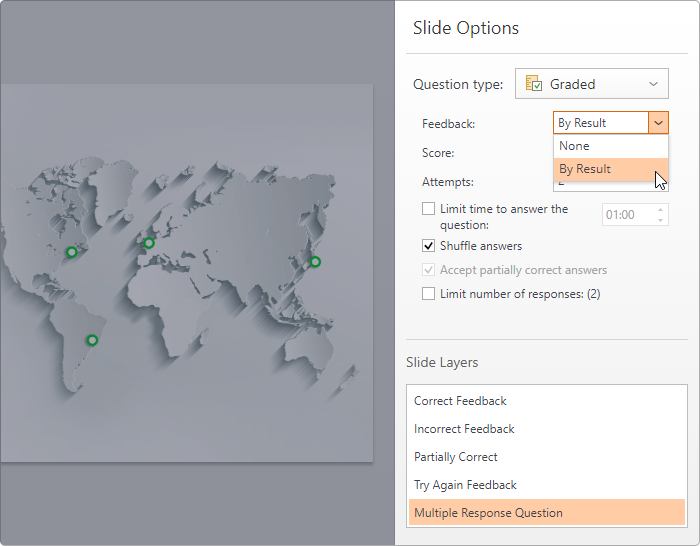
- Enter Feedback and Branching information to redirect the learner based on whether their answer is correct, incorrect, or partially correct.
- Add information or hints in the Feedback field to help your learners correct mistakes.
Add branching options to take learners back to specific pages in the module to review information specific to this knowledge check question.
- Select By Result to compute the learner’s score based on whether the answer was completely correct.
- Select By Choice to give the learner partial credit for selecting some, but not all, of the correct answers.
Limit the number of attempts each learner can make to answer the question. For most question types, it’s best to allow no more than two attempts. For True/False questions, allow only one attempt to answer correctly.
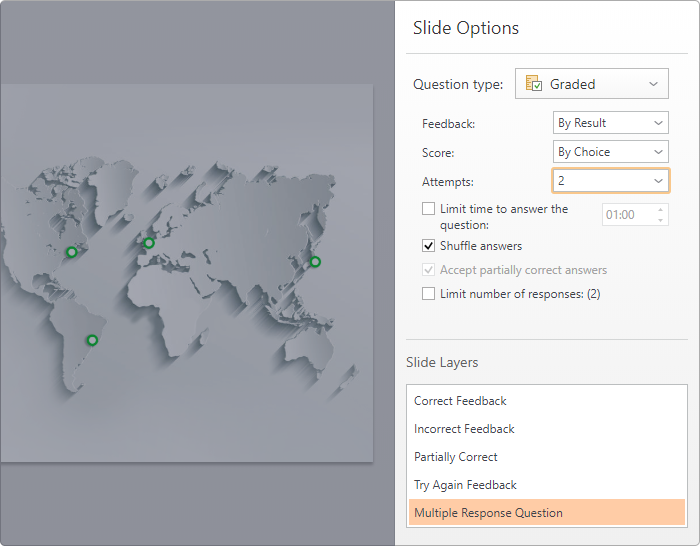
HINT: Putting a limit on the number of times each learner may try to answer a question increases the likelihood that correct answers are the result of actual knowledge, not guesswork or elimination of any known wrong answers.
Step 6: Save and update your question bank
Click the drop-down arrow next to the File icon at the top left of the screen. Select Save, then choose a location and enter a name for your quiz.
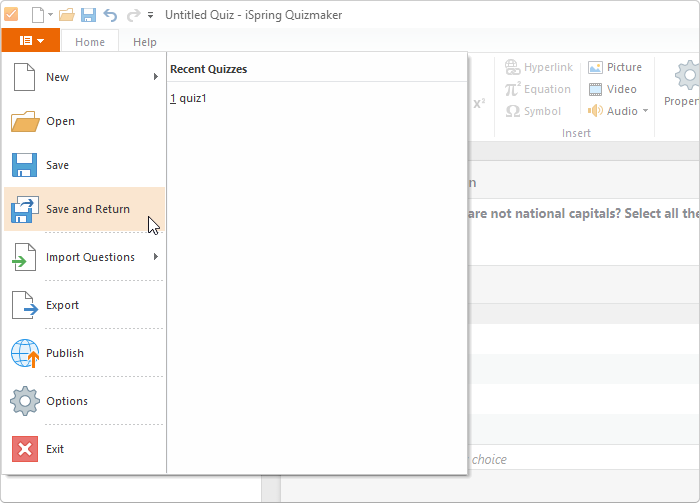
You can continue to add questions to this group (or bank) of questions anytime.
Creating a Drag and Drop question
A Drag and Drop question is an effective and, at the same time, engaging way for learners to show their ability to apply what they know. In this question, they must drag text boxes, pictures, and/or shapes to the specified places on the slide.
For our Waste Sorting quiz, let’s create a knowledge check question that requires learners to put the waste into the right recycling bin.
Step 1: Add a question
Click the Questions tab on the top left of the ribbon to display the question types available. Select Drag and Drop (NOTE: If you mouse over the image, a thumbnail will pop up with information about the question type.)
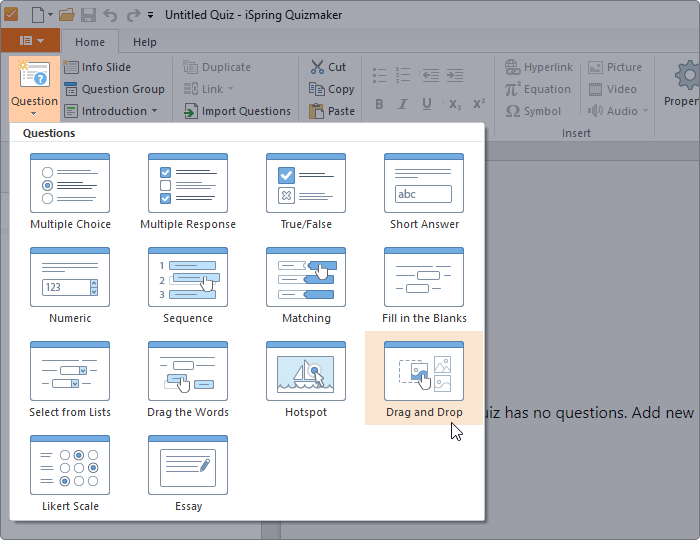
Step 2: Switch from Form View to Slide View
The question opens in Form View by default. Click the Proceed button to switch views.
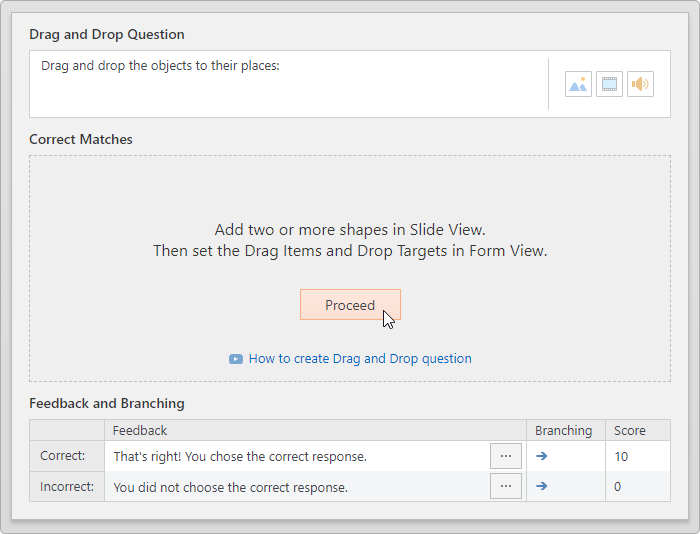
Step 3: Add images to the Slide View
For this task, let’s upload a picture of the frying pan and the images of the ingredients you want a learner to drop in the pan. Edit the headline text box to provide instructions for your learners.
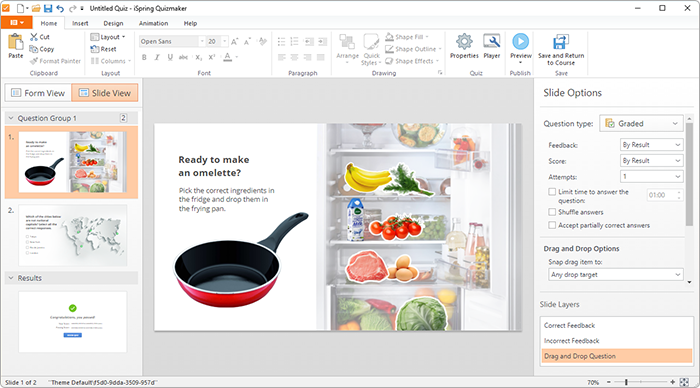
Step 4: Identify correct matches in Form View
After placing all the content on your screen, click to return to Form View. Click the down arrow next to the first item in the Drop Target column under Correct Matches. Select the image that the first item in the Drag Item column should be dropped to. In this example, the picture of eggs should be dropped in the frying pan. Continue matching each correct Drag Item to its Drop Target until you’re finished.
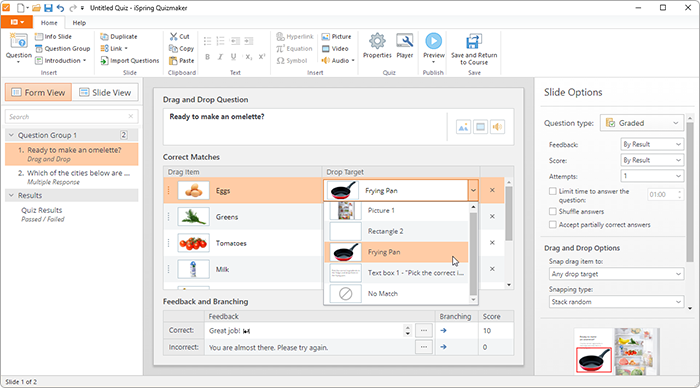
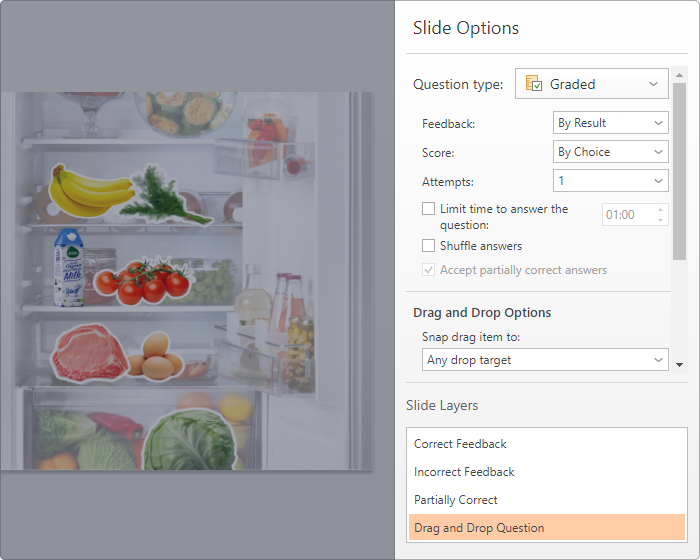
Step 5: Select your Slide Options
Specify the Feedback Type, Score, and number of Attempts for this question.
HINT: If you allow more than two attempts, you may want to limit the time allowed to answer the question. A time limit will reduce the possibility that a learner may get full credit through the process of trial-and-error with each ingredient.
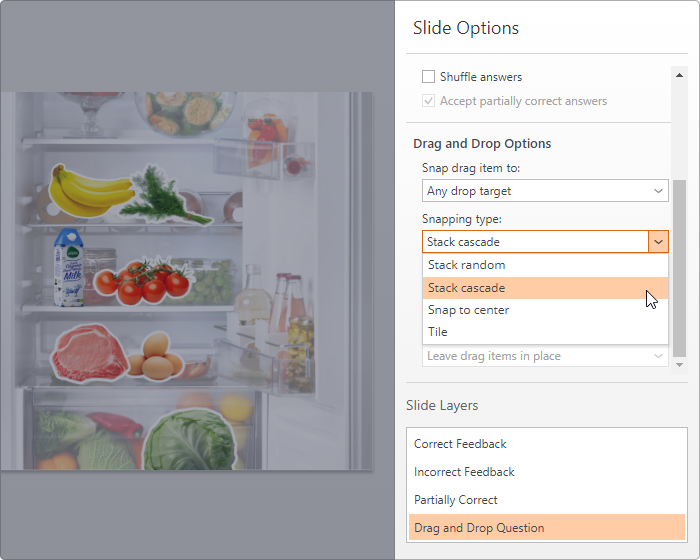
Step 6: Select your Drag and Drop Options
You can set a default to specify how drag items will snap to a target and stack onto the target.
Want to learn more about this question type? Watch a video tutorial on how to create a Drag and Drop question.
As you can see, the process for creating a question type is fairly intuitive, once you’re familiar with the iSpring Suite interface.
How to Enhance Knowledge Checks
Knowledge checks are a way for learners to review their learning progress and see where any gaps exist. When questions are too easy, learners can feel overly confident. Extremely difficult knowledge check questions can scare learners away from a topic. Pay attention to these details so that you strike the right balance with each knowledge check question:
- Random Distribution of Questions: Setting your knowledge check to randomly select questions from a question bank means that the learning experience will be slightly different for each learner. Unique experiences decrease learners’ ability to cheat or collude on an assessment.
- Time Limits: Time limits to answer a question can decrease learners’ ability to cheat on an assessment by requiring fast action to answer a question.
- Number of Attempts: Allowing your learners more than one chance to answer a question correctly can also increase learner motivation and engagement with the content.
- Branching: Branching subtly steers learners back to content for review, rather than simply passing everyone forward. You can use branching to send a learner back to the content to review a problematic issue. You can set your knowledge check questions to branch based on the response chosen.
- Feedback: You can choose not to provide any feedback to your audience, but providing feedback by result allows you to customize a response based on their actual performance.
To Sum Up
Incorporating several knowledge checks throughout an eLearning course is a great way to prepare your learners for success. An authoring tool such as iSpring Suite allows you to create and customize an array of knowledge check question types.
Ready to take your eLearning to the next level? Get a free iSpring QuizMaker trial right now.
Create interactive quizzes for learning, knowledge checks, and skill practice

