How to Create a Virtual Classroom: the Instructive Virtues of Virtual

Twenty-twenty is considered perfect vision. So, here we are in a ‘visionary’ year (“the future is now” – 2020, right?) and this article will examine how to look good in a virtual class. No, not how to be “virtually classy” (yes, the concept does exist), but how to best create a virtual classroom and conduct a virtual class. The hows and whys. The nuts and bolts. Stick with us and we’ll “nail it” – together.
And you want an authoritative take on the subject? Alright, this post is based on a webinar hosted by iSpring with special guest speaker Cindy Huggett. She is ‘virtually’ one of the queens of online learning, as she has been moving thousands of corporations, educators, and learners online for almost two decades. Yeah. We know. That sounds like forever. And since IT years are kind of like ‘dog years,’ that probably is fairly close to infinity.
What Is a Virtual Classroom?
But before our class begins, let’s define virtual training as Ms. Huggett does. In her words, it is:
“A highly interactive, online facilitator-led class, with defined learning objectives, with participants who are individually connected from geographically dispersed locations, using a web-based classroom platform.”
And that is what happens – or is supposed to – in a virtual classroom. That’s right, as many have discovered, transition to a virtual classroom is not simply a matter of closing a door and flipping a switch. Although we’ve all become at ease with the use of computers and VOIP phone and video calls, the dynamics just aren’t the same as being face to face in a physical classroom setting. And it’s not that one is ‘better’ than the other, as both present pros and cons, it’s that they’re (very) different.
Cindy points out three salient differences:
- Use of technology: Trainer and participants meet in an online classroom, usually without eye contact
- Updated trainer skills: An updated skill set is needed for virtual delivery
- New engagement techniques: Remote participants must be engaged in the learning
She also clarifies that there are three components to a successful virtual class:
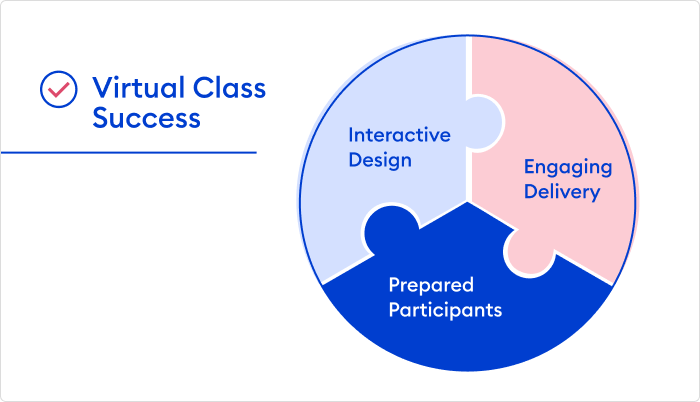
How is that different from, say, a webinar? Aren’t they both examples of online learning? Merriam-Webster’s defines webinar as:
“A live online educational presentation during which participating viewers can submit questions and comments.”
You’ll note that Ms. Huggett’s definition of virtual classroom includes “highly interactive” and, as mentioned further on, she points out that it has a “student-centered” approach (although it is led by a facilitator). This differs from a webinar, which is often more of a talking-head lecture, with possible screencasts, slides, polls, and chat feedback included. You can get a good sense of this profile by watching the webinar that this article is based on (link at the end of the article).
And now, B2C (back to class): as you may have taught or attended a class or two in a virtual classroom by now, all this might ring true for you. But how did it go? Was there effective interaction between the instructor and the learners, and among the online classmates? If everyone could see each other, were the images clear and lighted effectively? Was the class prepared adequately? Were there any IT disasters like disappearing instructor(s)/classmates, computers locking up, or links with kinks?
We thought so. And that is the point of this piece. So, read on.
Creating a Virtual Classroom Setup
How can we make sure we get it right in order to glean the most value from precious virtual class time? A learning experience that is meant to move you ahead should not end up a headache. Let’s look at some key factors that will help ensure that your time ‘spent’ provides a good ‘temporal’ ROI.
1. Clarify definitions
“Discover the definition behind every event and make sure everyone is on the same page.”
Ms. Huggett points out that there are five basic types of online events: meetings, video conferences, webcasts, webinars, and virtual training classes. In our case, we are addressing the latter: a virtual class in a virtual classroom. How often do these detour (or degenerate) into something else if they are not clearly defined before the session begins? Have you ever initiated a class that became an argument or an informal chat session? Success requires focus. And in order to focus, we need a clear definition of what will occur – and the aim of the virtual encounter needs to be maintained the entire time that the class is in session.
2. Learn the technology
“The biggest failure of online trainers is simply not knowing the technology. Learn it so well that you know what every button, menu, and command does – for both hosts and participants.”
There is no margin for system hiccups. Everything happens in real-time, so it all has to work flawlessly. Know your tools. We’re assuming that your hardware is up to speed, so this means virtual classroom software. There are many options out there and your organization may or may not have already selected one for online staff interactions.
There is a multitude of web conferencing platforms, the most popular being Zoom.
For those not yet familiar with it, Zoom is a “cloud platform for video, voice, content sharing, and chat [that] runs across mobile devices, desktops, telephones, and room systems.” And hey, 58% of Fortune 500 companies and 96% of top US universities already use it.
If you plan to conduct face-to-face instruction, you’ll need a unified system that will simplify the process. That’s why Zoom is integrated with some learning management systems (LMSs), such as iSpring Learn. This LMS enhances virtual training by serving as a single planning center for all your eLearning activities, also allowing you to deliver any related content, including stand-alone eLearning courses. With it, you can schedule both classroom sessions and video meetings. Also, after the event has ended, iSpring Learn will create a report informing you how many people attended and even how long they attended.
To get more details about how iSpring Learn and Zoom work together, check out this article.
3. Be prepared
“Your preparation should include reviewing the content, setting up your workspace, and preparing technology backups. The more advanced planning you do, the better prepared you’ll be for every possible circumstance.”
Surprises. As mentioned, virtual classes – like all live classes – happen in real-time. So, there is no room for hemming and hawing, dropping pencils, webcams falling to the floor, phones ringing, onscreen pop-ups, barking dogs, and a host of other things that can and do crop up if they are not handled – and tested – prior to class time. Been there? Don’t go there.
Content. Any class is about the content that will be delivered. Do you have the material down cold? You’re (of course) reading bulleted items and not reading text. Have you distributed the material that the learners need to read/view and/or work on before the class begins? All live links are still live? Do you know where all the material is located that you’ll be using during the class? It has to be within easy reach.
Tech backup. What if something breaks before or during the class? Computers die. Do you have a backup machine humming away in the wings, just in case? For that matter, do you have a backup of e-v-e-r-y-t-h-i-n-g? You can look at the virtual classroom as an educational reality show. You need to be “on”(line) all the time for it to work. You can’t just show up. You also need to appear.
And speaking of backup, you might consider having a tech assistant (producer) in the wings to get you back ‘on the air’ if/when machines decide to conspire against you while class is in session.
Switch sides. Do you know how the learners will need to use the software on their end? Try logging in as a student to make sure they won’t encounter any problems – or if they do, you’ll be able to address them on the spot.
Learner preparation
Besides knowing what they will encounter on their end, those who will attend need to be prepared as well, and this preparation needs to begin at least one day prior to the online event.
Let them know that it is going to be interactive: as many people have a tendency to be on ‘another channel’ in a classroom setting – whether in a physical or online classroom setting – this will be a ‘heads up’ that they will be ‘on the hot seat’ from time to time. Cindy points out that the message can include a preparation checklist on how to set up the workspace, how to connect, and what to do if challenges arise. You may also want to let them know how to behave during the virtual training session:
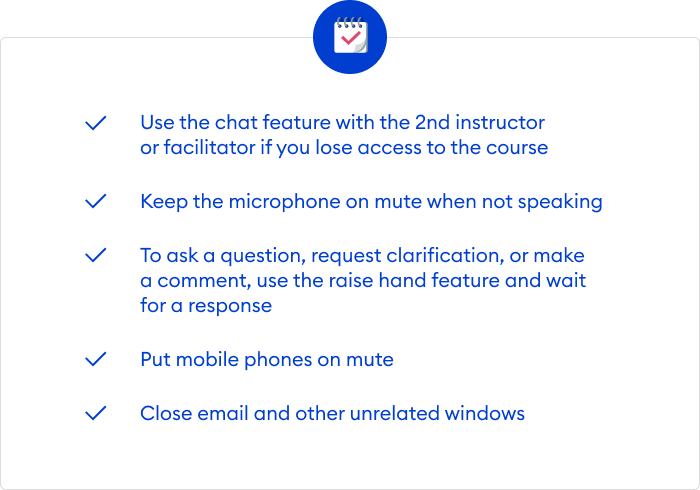
An example of virtual classroom orientation for attendees
4. Engage participants
“The biggest benefit of virtual training is that participants don’t have to leave their desk to attend. It’s also the biggest challenge. Therefore, creatively use all of the platform tools and features to engage participants frequently throughout the event.”
One important point to consider is that the instructor’s process is different in the physical classroom than it is in an online situation. Whereas an instructor has more of a presenter role in the brick-and-mortar classroom, they are placed more in a facilitator role when instructing online, allowing the audience to come to their own conclusions.
Ms. Huggett explains that you want the learners to feel connected, confident, and engaged – but not isolated or overwhelmed. You’ll note by this that online instruction takes on more of a “student-centered” approach, as contrasted to the traditional in-person “instructor-led” classroom approach. One way to do that, she says, is to prepare the participants by setting expectations in advance.
Instant engagement
Another tip is to endeavor to capture (and maintain) learners’ attention as soon as they log in. You want to draw them in immediately, and this can be accomplished by displaying a login slide that includes a discussion question or an activity that everyone can participate in.
When class starts, instead of simply introducing yourself, it is suggested that you ask the participants to introduce themselves – as they may have never been in contact with each other, especially if the company is a multinational and the class includes learners on different continents. And web-conferencing tools like Zoom have an option for conducting polls/surveys, which is another great way to start the session.
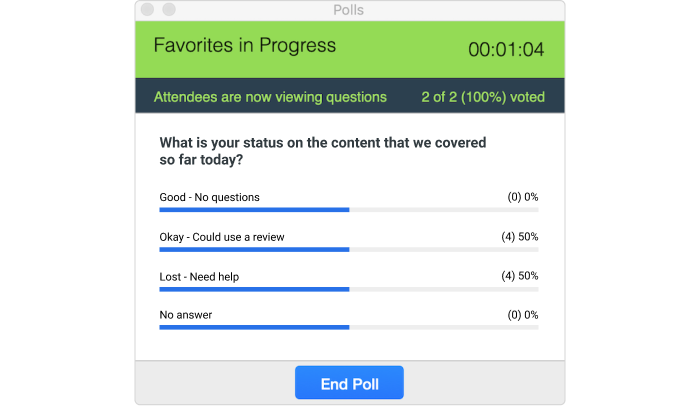
The point here is to make it social, which is something that happens more naturally in a physical classroom and is significantly more difficult to accomplish through an online conference call platform. While online, the participants can use the questions tool and the raise hand tool to introduce themselves and connect with the group.
Intermittent interaction
And to keep things going, the instructor needs to invite interaction periodically. But how often and in which way?
The suggestion here is to stimulate interaction about every four minutes, and other sources recommend about the same: every three to five minutes. That may seem like a lot (about 15 times during a 60-minute period), but during an online class, attention can wander easily.
Suggestions here are using the hand raising tool or writing on the whiteboard – for introductions and/or brainstorming. It’s worth noting that an interactive online whiteboard is a powerful interactive tool, as materials (pdfs, videos, and audio files) can be embedded directly into it and learners can write or type or draw on it and save this for later study.
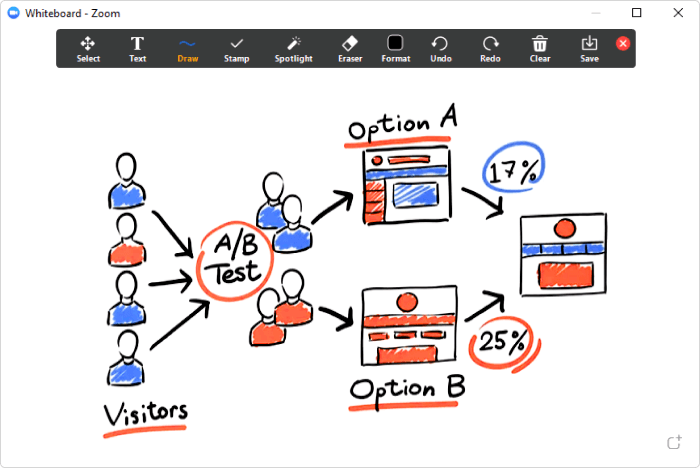
Mix it up!
Use different types of media to present content, such as (brief) texts, pictures, infographics, audio, and video. Also, keep it light – especially now… Consider using narrated animations and even humorous educational videos. Brief quizzes can also be a lot of fun and allow you to assess learners’ command of a topic.
A great way to engage is for the instructor to turn on their webcam periodically (but no talking head classes, OK?) and, in a Zoom-type classroom, for all participants to turn their webcams on – the latter being more practical for introductions or discussions.
This brings us to the next point:
5. Enhance delivery skills
“Remember what you already know about the adult learners and facilitation skills – it all still applies in the virtual classroom. What’s new is the increased emphasis on your voice, the new technique for asking questions, and the required skill of multitasking.”
It’s unavoidable that the delivery skills needed for teaching in the virtual classroom are different than those used in a physical classroom. Whereas physical location in the room, proximity to a person, and body language (gesticulations, posture, etc.) are classic tools for energizing a classroom full of learners, none of these aspects are available in an online classroom.
Since the instructor will probably have their webcam on, Cindy mentions that camera technique has to be honed: have your camera at eye level to avoid looking down into the camera, which gives an overbearing impression. You want to give a sense of equality with the participants to allow a more conversational feel – an approach used by television news reporters. And no, your laptop’s webcam does not have sufficient quality – a separate mounted camera is advised.
As framing is important, she points out that your shoulders need to be in the frame. Here’s her technique: placing the palm of your hand on the top of your head (with the palm towards the camera), your little finger should be at the top edge of the screen. This will place your body at the correct distance from the camera.
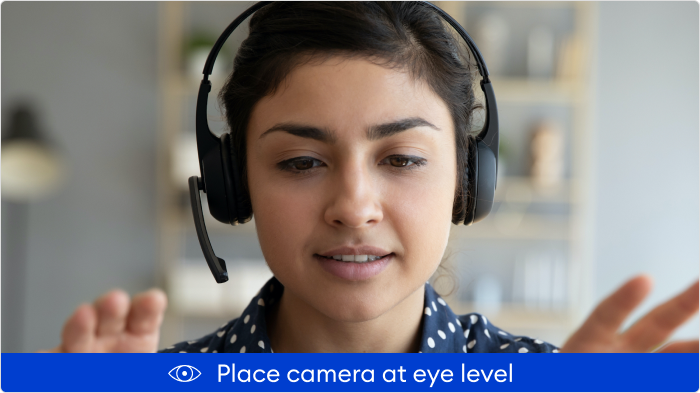
Lighting is also very important: shadows and low light can make it that much harder for the audience to connect with you. The recommendation here is to avoid sitting in front of a window, for example, as the backlighting will make it difficult to see your face. You want to have the lighting in front of you shining toward your face. Professional lighting is not necessary. Also, the backdrop doesn’t need to be incredibly sophisticated – but it should be tidy (no dirty laundry, etc.). When we are teaching from our home learning environment, an appropriate backdrop might be more difficult to arrange, in which case a green screen might be a good solution.
And dress well. How many unkempt online presenters have you seen in old t-shirts? Right.
6. Harness your voice
“Your voice is a key component of your virtual training delivery. Pay attention to your volume, rate, tone, and overall sound. Ensure your audio connection is crisp and clear, without distraction to the learning experience.”
Have you ever turned a video off because the sound was garbled? Well, the same goes for the virtual classroom, but in this case, the audience will ‘turn off’ even though they can’t literally disconnect from the class. Ms. Huggett recommends that you:
- Invest in a headset to ensure that quality sound is being transmitted to the participants
- Sit with your best posture (but not stiff) to project an image of integrity, authority, and professionality
- Take solid, deep breaths to energize your voice and keep the participants engaged
If mastery of all this seems a long way off, consider that even the most accomplished online teacher was a novice at one point. And the way they got where they are now was through.
7. Practice, practice, practice
“The best virtual trainers practice relentlessly. They strive for continuous improvement in their delivery.”
- Look for ways to optimize your virtual ‘podium’
- Master the technology and get comfortable with it
- Do dry runs with producers to handle issues before class so they don’t ruin the real-time classroom process for you and the audience
If the process of optimization seems endless, that’s because it basically is. There will always be ways to tweak the way you present, your studio, your material, and the technical setup.
5 Tips for a More Effective Virtual Classroom
Now that we’ve laid out some of the basic parameters for setting up your virtual classroom and conducting your online class, let’s look at some tips for enhancing class/room effectiveness:
- Rules. Whereas you want to engage the participants, you also don’t want to incite a riot. As the number of students increases, there is more room for chaos, so you want to make it very clear from the beginning that people should not interrupt each other. It’s also a good idea to ask everyone to turn their smartphones to vibration mode to avoid a constant stream of bleeps and ringtones.
- Questions. Keep track of how many questions you have asked each specific student and how many questions each one has asked. This will help to avoid that some participants drop/fade out of the stream of things and that others dominate.
- More questions. As the learners will not be seeing you the same way that they would in a physical classroom setting – or perhaps not at all if you are using lots of videos and/or screencasts – asking more questions than you ordinarily would will help keep them engaged.
- Groups. You can set up virtual “breakout rooms” in which smaller groups of participants can perform a group task, such as brainstorming (4-6 persons max per group). You can ‘visit’ each group to facilitate them and then bring everyone back together for presentations by the group leaders. This, however, requires a more advanced command of the software being used.
- Overload. You’ll probably assign homework and pre-class assignments: the former provides continuity to material, as only so much can be covered in class, and the latter serves to prepare learners to more readily digest the material that will be addressed during the actual class time. But don’t overdo it! As you are instructing working adults, take into account the time that they’ll have available for these assignments. Keep in mind that just because they can access the material anywhere, anytime, doesn’t mean they can (or should) devote every waking minute to the course material. It also might be helpful to provide an estimated reading/studying time for each assignment to facilitate learners’ time management.
Final Thoughts
Is the traditional brick-and-mortar classroom going away? Well, we do see a decline in the use of a face-to-face physical classroom setting in companies (especially in the current pandemic scenario): whereas 70% of all formal training hours were held in a physical classroom in 2005, this fell to 54% in 2019, according to ATD’s 2019 State of the Industry report. And this percentage is certainly much lower in 2020. But disappear? Probably not.
So, is the virtual classroom the wave of the future? It’s more like the wave of the present. So let’s all ‘get a move on’… online, that is.
We would like to express our gratitude to our eLearning expert for sharing her knowledge:

Cindy Huggett, Virtual Training Consultant
Cindy Huggett is a CPTD who helps organizations move to the virtual classroom. Over the past 20 years, Cindy has taught thousands of trainers how to facilitate engaging live online classes. She’s a past member of the national ATD Board of Directors and was one of the first to earn the Certified Professional in Learning and Performance (CPLP, now CPTD) designation.


